


How to Fix Instagram Story Video Blurry Problem?
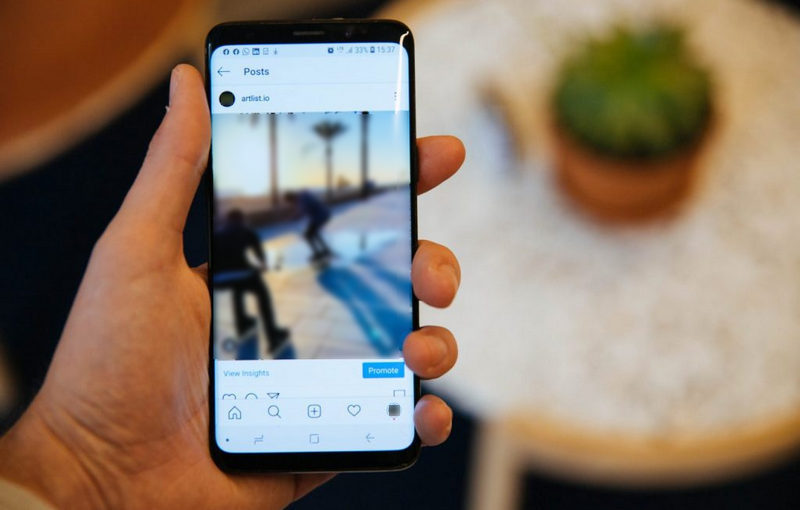
"Why are my Instagram stories videos blurry? Is it possible to fix blurry videos on Instagram Story and get the high-quality videos on Instagram?" - Joan
Instagram is a great way to share your skills using photos and videos. Is your Instagram Story video bad quality after uploading to Instagram? It gets annoying if your favorite platform does not give the same quality result as before. Well, luckily for you. In this article, we would like to tell you why the video on Instagram Story is blurry, and how to fix low video quality on Instagram Stories.
 Part 1: Why Are Your Instagram Stories Videos Blurry
Poor-quality videos on Instagram Stories can occur for many reasons. Before talking about how to fix poor Instagram video quality, we’ll introduce some common reasons why the Instagram Video becomes blurry.
1. Bad/Weak Internet Connection
When you are on mobile data or a slightly slow Wi-Fi network, your stories may appear blurry. The reason behind this is that Instagram automatically lowers the quality of stories if the Internet speed is slow while uploading.
2. Instagram Settings When Using Mobile Data
Instagram has a feature that limits the data uses if a user is on a mobile network. Because of this feature, a user can save his data and use Instagram. This sounds great at first, but there is a drawback to it. Because of limited data use permission, your stories will also get affected.
3. Instagram App Is Outdated
The quality of your story may be blurred after uploading if you’re using an older version of the Instagram app.
4. Camera Settings of the Phone Are Unbalanced
The camera app of your phone might be good, but that can be an issue that does lead to the blurry video.
5. The Video Being Uploaded Is Not of the Required Standard Size
If you did not implement the specifications required by Instagram, then the video quality will get poor.
 Part 2: Best Solution to Fix Blurry Instagram Videos Using AVCLabs Video Enhancer AI
When it comes to fixing blurry Instagram Videos, an AI-based video enhancement tool - AVCLabs Video Enhancer AI is strongly recommended for beginners. It helps users upscale low-quality or blurry Instagram videos from 480p, 720p to 1080p, and up to 4K automatically and intelligently. No video editing skills are required. What's more, the blur and noise of the Instagram videos are also removed automatically and smartly. With an intuitive interface and navigable layout, it is really easy for you to get started. And the free trial version supports 3 videos enhancement and you can test and evaluate the full features.
Video Enhancer AI
- Enhance the video quality to make them more aesthetically pleasing.
- Deblur your footage by using machine learning.
- Upscale videos from SD to HD, HD to 4K.
- Upscale low-res videos onto a larger screen.
- Trim your footage frame by frame.

Let's follow the steps below to learn how to troubleshoot Instagram video quality issues.
Install and Run AVCLabs Video Enhancer AI
Warm tips: Before starting to fix the video, you can click here to check whether your CPU or GPU is capable of fixing blurry Instagram videos with AI.
Firstly download the AVCLabs Video Enhancer AI from the above button and install it on your Windows PC or Mac computer. Double-click the program icon to run it and then you will enter the main interface of AVCLabs Video Enhancer AI.
Import Video
Simply drag & drop the blurry Instagram you wanna upload to Instagram from your computer to the main window. Alternatively, you are allowed to click on the "Browse" button at the bottom of the program interface and add the low-quality Instagram video file to the program.
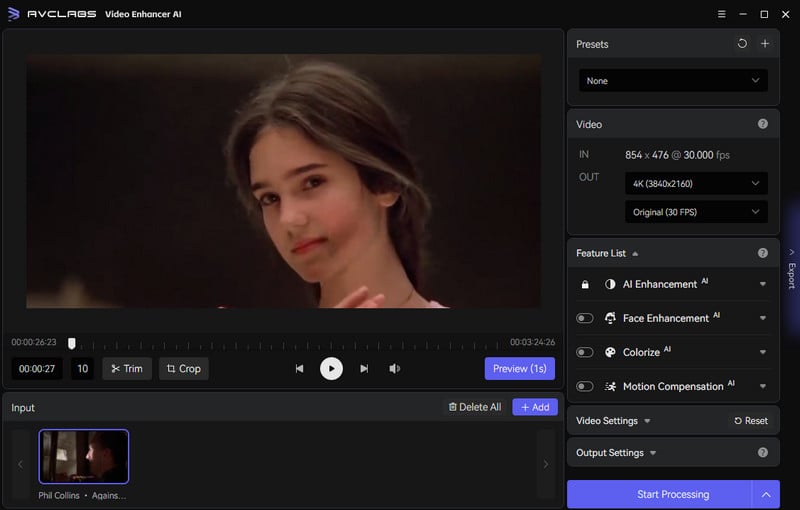
Select the AI Model and Set the Output Parameter
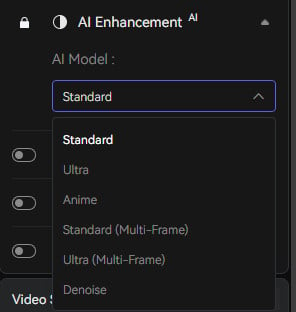
There are multiple AI models for your option. Just go to the Feature List menu, and choose an AI Model you prefer under AI Enhancement. To enhance the face in the video, you can switch on Face Enhancement to detect and enhance every detail to make your subject look great.
Simply unfold the Video-Out options and adjust the output to 200%, 400%, SD, HD, 4K UHD, 4K, and 8K. Leave the output FPS to the original value if you don't need to modify the frame rate. Trim or crop the video if you want.
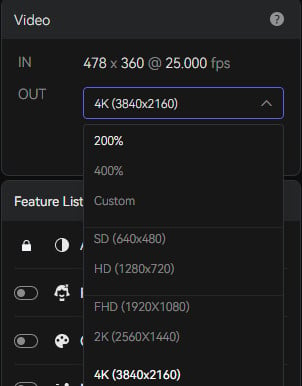
Before enhancing the video quality, you can change the video settings including brightness, saturation and sharpness. Feel free to customize the output settings, including output format, encoder, bitrate, etc.
Start Improving Video Quality
After all the settings are completed, click on the "Start Processing" button to start repairing your video. The whole video processing time depends on your PC’s system configuration, video size, and output video resolution. Once the video fixing process is done, you can click on the "Open Output Video" button to find and view the output video. Then you can upload the clear video to Instagram and then enjoy your new Instagram journey.
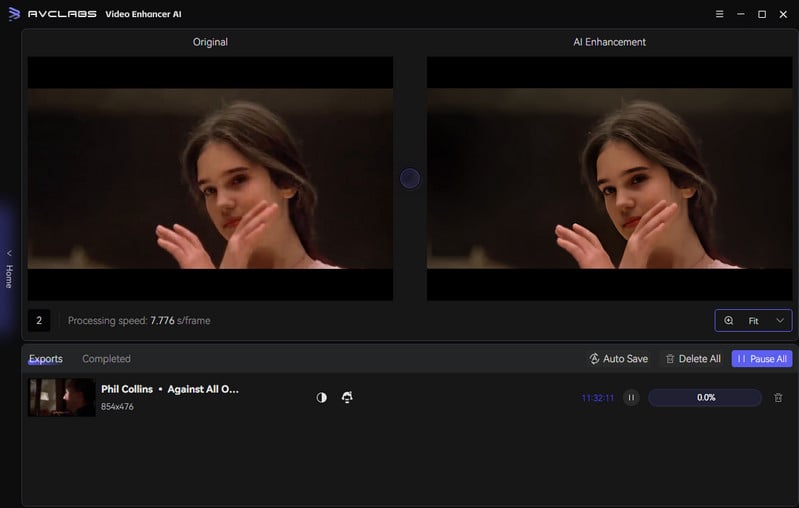
During processing, you can click the Home button on the left of the screen and return to the main interface for adding more videos.
Part 3: Common Ways to Fix Blurry Videos on Instagram Stories
Here we will offer you some solutions that will help fix Instagram video quality and resolve the issue of blurry videos on Instagram Stories.
1. Check Internet Connection
Firstly, we highly recommend you check your internet speed, and if it’s low, then change the network and try to connect your device with a stable WIFI adapter to mobile data. Then upload the video again to Instagram to fix the blur issue.
2. Adjust Instagram Mobile Data Setting
Instagram provides you with advanced and automatic settings to keep your mobile data usage to a minimum. However, this will lower the Instagram video quality. If your stories are getting blurry and of lower quality, then you should turn off the data-saving feature while uploading stories. Here are the simple steps on how to do that;
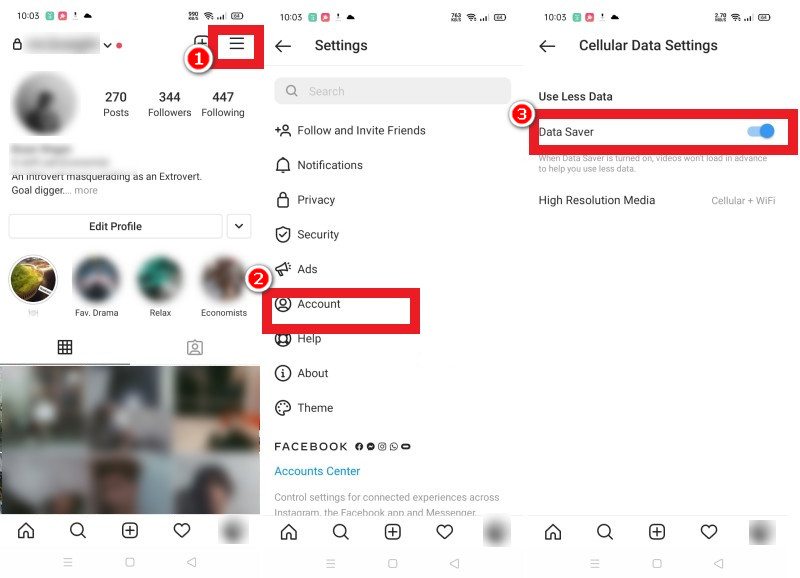
1. Open the Instagram app, and tap on your profile icon at the bottom.
2. Tap the More option (hamburger menu) in the upper-right corner, and then select Settings.
3. From here, choose Account and then go to Cellular Data Use.
4. Toggle off the Data Saver option.
3. Update the Instagram App
Instagram app updates itself when your mobile device is connected to a Wi-Fi network. But sometimes this doesn’t go the right way, and the app fails to update automatically. When you’re on an older version of Instagram, Instagram Story videos may look worse. You need to download and install the latest version of Instagram, then upload the best quality stories.
4. Adjust Camera Settings
When your phone is unable to record or capture high-quality output, you need to adjust the camera settings. Just follow the tips below:
On Android:
1. Open the Camera app on your Android phone.
2. Press on the Settings icon.
3. Adjust the video size to the highest quality.
On iOS Device:
1. Open the Settings button app on iPhone, iPad.
2. Find the Camera option.
3. Adjust camera quality and toggle the Smart DHR on.
5. Resize Your Video before Uploading
To fix this issue, you can resize your video to 1080p or 4K using any third-party video enhancing app. FlexClip, Any Video Converter Free, AVCLabs Video Enhancer AI are some of the best apps to adjust video quality.
Part 4: Extra Tips: Instagram Video Format Specifications Recommendation
Actually, here are recommended specifications that if you apply, then the video quality is automatically improved. The best video format for uploading a video on Instagram is MP4. Let's learn about the video format specifications recommended for Instagram.
1. H.264 Codec.
2. AAC audio stream.
3. 3500 kbps bitrate for video.
4. The frame rate of 30 fps (frames per second).
5. Maximum file size of 15 MB.
Or the file of the post is over 15 MB which means that it will be compressed. To avoid Instagram ruining the quality of the stories that you post, you need to make sure that you’re uploading videos with a file size below 15 MB and that you have the correct aspect ratio.
6. The video must be a maximum of 60 seconds.
7. The best dimension is with maximum video width of 1080 pixels.
All Instagram stories are constrained within 1080px by 1920px aspect ratio so if you have a video that doesn’t fit this, it’s going to be compressed. Instagram makes your stories blurry for the best user experience in video loading, optimizing network connectivity, and taking up minimal space in the phone’s memory and drive.
8. The video should be 920 pixels tall.
Conclusion:
These are all tips and tricks for fixing blurry Instagram videos. Hopefully one of these ways will work for you to fix Instagram video quality. You will no longer experience blurred Instagram video stories. If you are a beginner without any advanced video editing skills, AVCLabs Video Enhancer AI is a perfect choice. What you need to do is add the video to the program and select the suitable AI model, then wait for the program to enhance the blurred Instagram video. Why not free download the program to explore the amazing features.
Try AVCLabs Video Enhancer AI to breathe new life into your footage!

Related Articles & Tips
- • How to Download Instagram Videos | 5 Proven Quick and Easy Solutions
- • Top 3 Best AI Video Upscaling Software to Upscale Videos up to 1080p, 4K, 8K
- • AI Video Deinterlacing Tool | How to Deinterlace Videos on Mac without Quality Loss
- • [Ultimate Guide] How to Sharpen A Video
- • How Will AI Enhance Surveillance Video Quality
- • How to Fix Bad Quality Videos
- • Two Ways to Improve Your Video Quality
 AI Products


Hero Products

Video Converter
- MP4 Converters
- MKV to MP4 Converters
- AVI To MP4 Converters
- MOV to MP4 Converter
- Best Free AV1 Converters
- HEVC/H.265 Converter
- H.264 Video Converter
- Android Video Converter
- Samsung Video Converter
- Sony PS4 Video Converter
- Nokia Video Converter
- MPEG Video Converter
- Convert 4K to 1080P
- Convert MP4 to MP3
- Convert M2TS to MP4
- Convert MVI to MP4
- Convert WebM to MP4
- Convert Videos to MP3
- Convert MP4 to 3GP
- Convert M4V to MP4
DVD Converter
Video Editor
- Best AI Video Editors
- Free AI Video Generators
- Best AI Slideshow Makers
- Replace Face in Video
- AI Cartoon Video Generators
- Text-to-Video AI Generators
- Best Free Voice Changers
- Text-to-Video AI Generators
- Sites to Download Subtitles
- Add Subtitles to Video
- Free Online Video Compressor
- Convert Your Videos to GIFs
- Blur Video Backgrounds
- Video Editing Apps for YouTube
Video Enhancer
- Best 10 Video Enhancer
- Improve Video Quality
- Fix Blurry Videos
- Remove Noise from Footage
- Upscale Video from HD to 4K
- Upscale Video from 480P to 1080P
- Best AI Video Upscaling Tools
- Make a Blurry Video Clear
- Best Old Video Restorer
- How to Sharpen Video
- Fix Bad Quality Videos
- Increase Video Resolution
- Convert Videos to 4K
- Upscale Anime Videos to 4K
Photo Enhancer
- Fix Blurry Pictures Online
- Make Blurrys Picture Clear
- Increase Image Resolution Online
- Remove Blur from Images
- AI Image Sharpener Online
- Topaz Gigapixel AI Alternatives
- Fix Low-resolution Photos
- Colorize Historical Photos
- Remove Noise from Photos
- AI Image Sharpener
- AI Face Retoucher
- AI Image Enlargers
Mobile & PC